Learning Make.com takes 25 to 40 focused hours to go from zero to production-ready automations, and you can build your first working scenario within the first two hours. The mistake most beginners make is learning from scattered tutorials in random order, so they meet iterators before they understand mapping and give up at the first BundleValidationError. This is the structured path I use when I train people on Make: six phases, each with a clear outcome, a practice build and the honest time it takes. Make Academy recommends roughly 19 hours of training before production work. This path covers that ground plus the reliability and AI-agent layers the official courses barely touch.
I am Prem Patel, founder of Nex Automations. I hold the Make Level 5 Expert certification, Nex is an official Make Silver Solution Partner listed in the Make partner directory and I have built 1,200+ automations for 210+ clients. I have also taught Make to 1,000+ students in live cohorts. Every phase below exists because I watched real learners get stuck at exactly that point.
Before you start: what Make actually is
Make is a visual automation platform. You connect apps on a canvas, and data flows through modules from a trigger to one or more actions. Each automation is called a scenario. If you can draw your process as a flowchart, you can build it in Make without writing code.
Two things to set up on day one:
- A free Make account (make.com, no card required). If you want the full platform while learning, the partner trial gives you one month of Pro with 10,000 credits: make.com/en/register?pc=prime.
- A learning project. Pick one real, small annoyance from your own work (a report you copy by hand, a form that feeds a spreadsheet, a message you send every Monday). You will rebuild this one project at every phase, and by phase 4 it will be running for real.
Phase 0: First contact (1 to 2 hours)
Goal: your first scenario runs end to end.
Tour the canvas, connect two apps and build the classic starter: a Gmail or form trigger that writes a row to Google Sheets and sends you a notification. Do not aim for useful yet. Aim for the feeling of one green run.
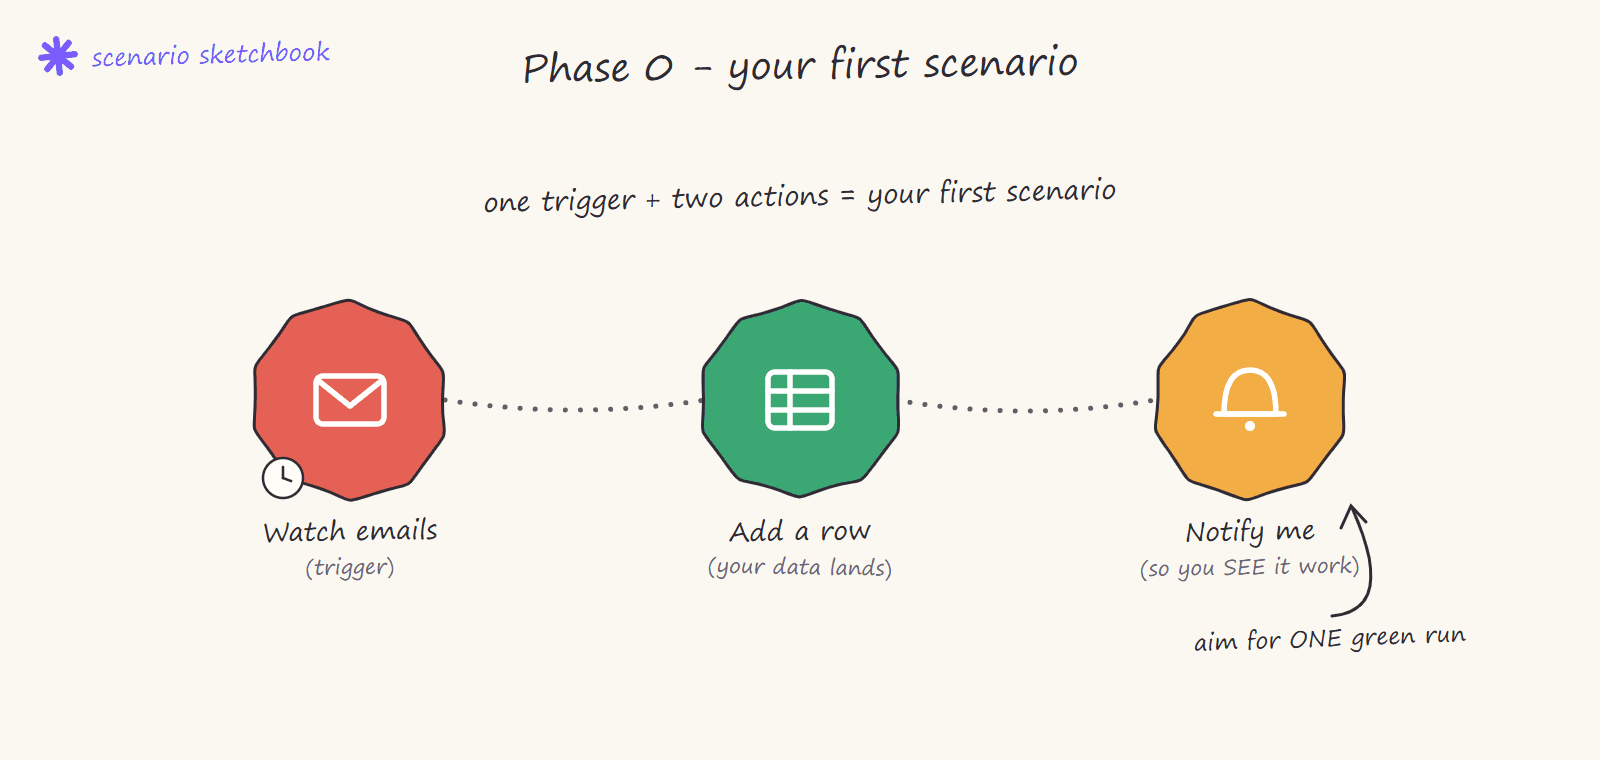
What to learn here: scenarios vs modules, connections and permissions, the run history panel, turning a scenario on and scheduling it. My full beginner walkthrough covers this phase step by step: The Complete Make.com Guide for 2026.
You are done with this phase when you can explain what a trigger is, run a scenario manually and find why a run failed in the history panel.
The one thing to understand before phase 1: how scenarios actually start
Every scenario begins with exactly one trigger, and Make has three kinds. Beginners pick the wrong one constantly, then wonder why their automation is either slow or burning credits.
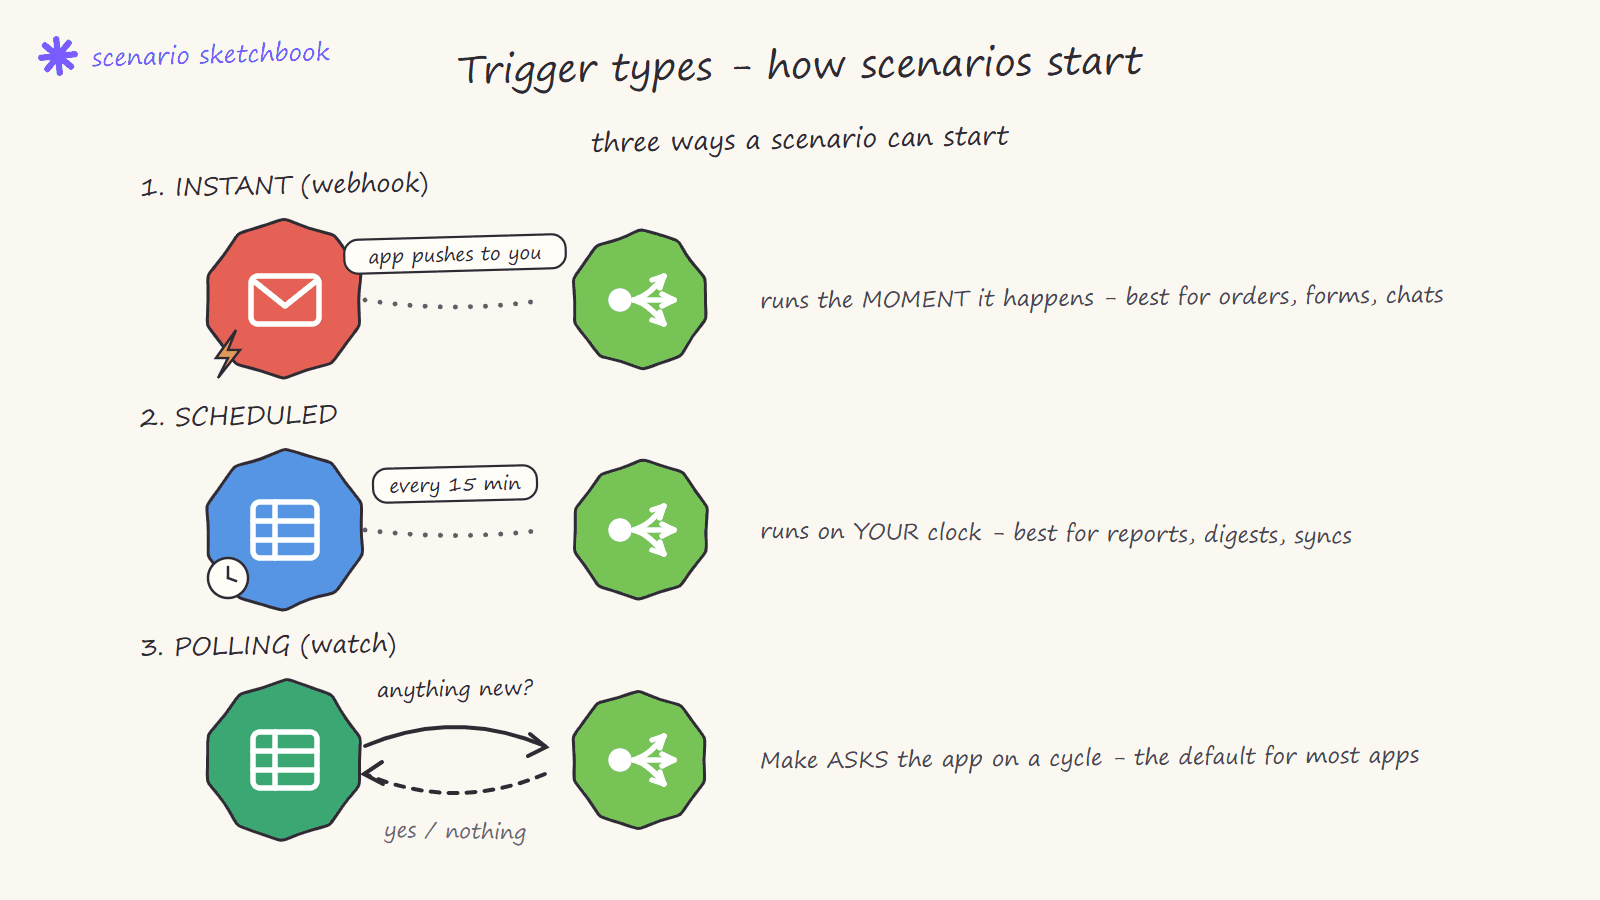
Instant (webhook). The app pushes data to Make the moment something happens. A customer pays, a form is submitted, a message arrives, and your scenario runs within seconds. In the module list these are named "Watch X (instant)" or you build them with the Webhooks module and paste the URL into the other app. Use instant triggers for anything a human is waiting on: order confirmations, lead replies, support routing.
Scheduled. You choose the clock. Every 15 minutes, every hour, at 9am on weekdays, on the 1st of the month. The scenario wakes up, does its work and sleeps. Use scheduled triggers for reports, digests, reconciliations and syncs, where "within the hour" is fine and nobody is waiting.
Polling (watch). The most common and least understood. Make asks the app "anything new since last time?" on a cycle, and processes whatever comes back. Most "Watch Records" and "Watch Rows" modules work this way. Two things matter: each check consumes operations even when nothing has changed, and the scenario keeps an internal marker of where it stopped last time, which is why re-running a scenario sometimes returns nothing at all.
The practical rule I teach: if a person is waiting for the outcome, use instant. If a report is due, use scheduled. If neither, polling is fine and cheapest to set up. Getting this one choice right is worth more than any advanced technique later.
Phase 1: Mapping and data flow (4 to 6 hours)
Goal: you stop copying tutorial clicks and start understanding what the data is doing.
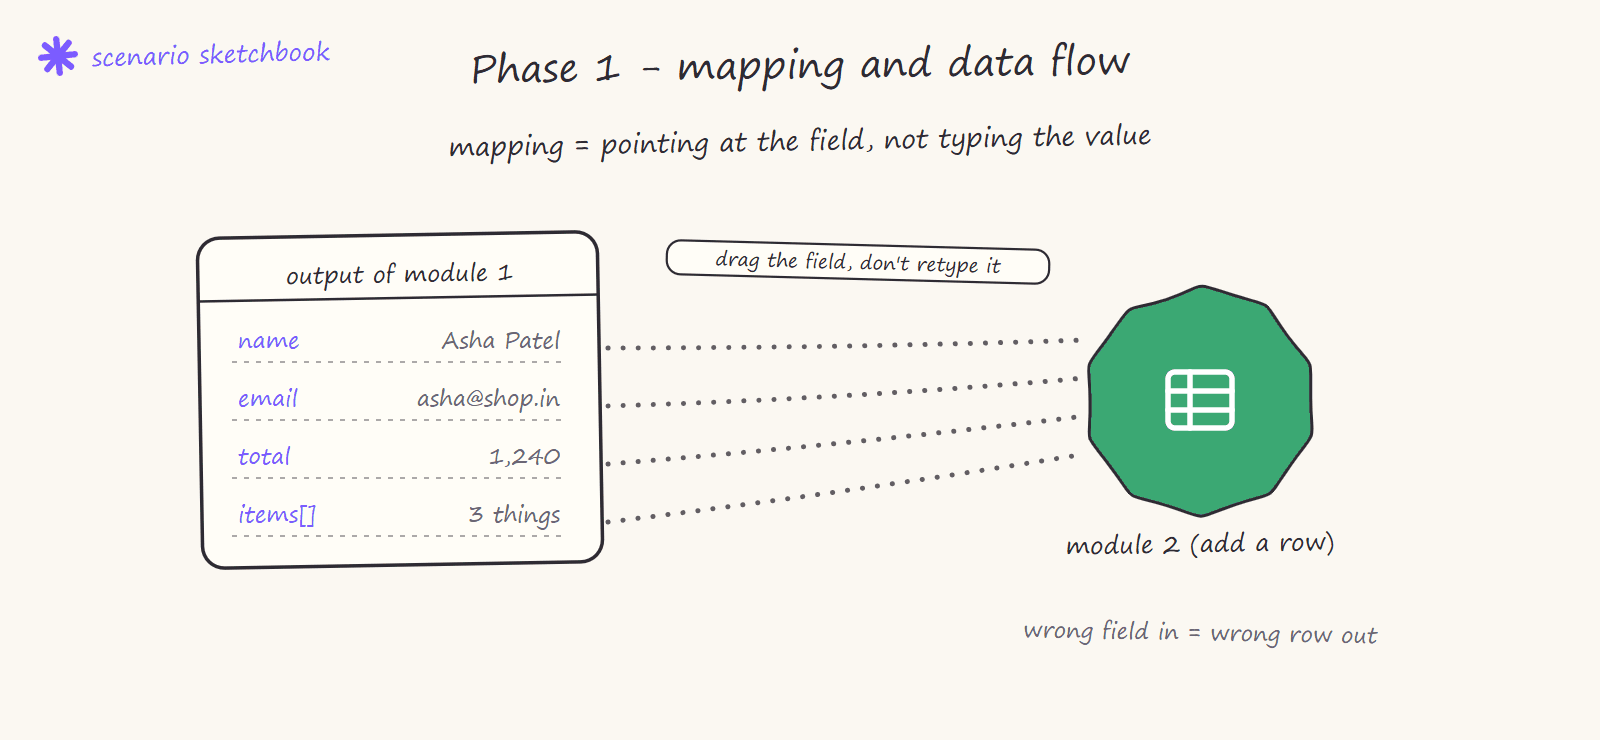
Everything in Make is bundles of data moving between modules. Mapping is how you tell each module which piece of the previous output to use. Spend this phase deliberately breaking things: map the wrong field, look at the output bundle, fix it.
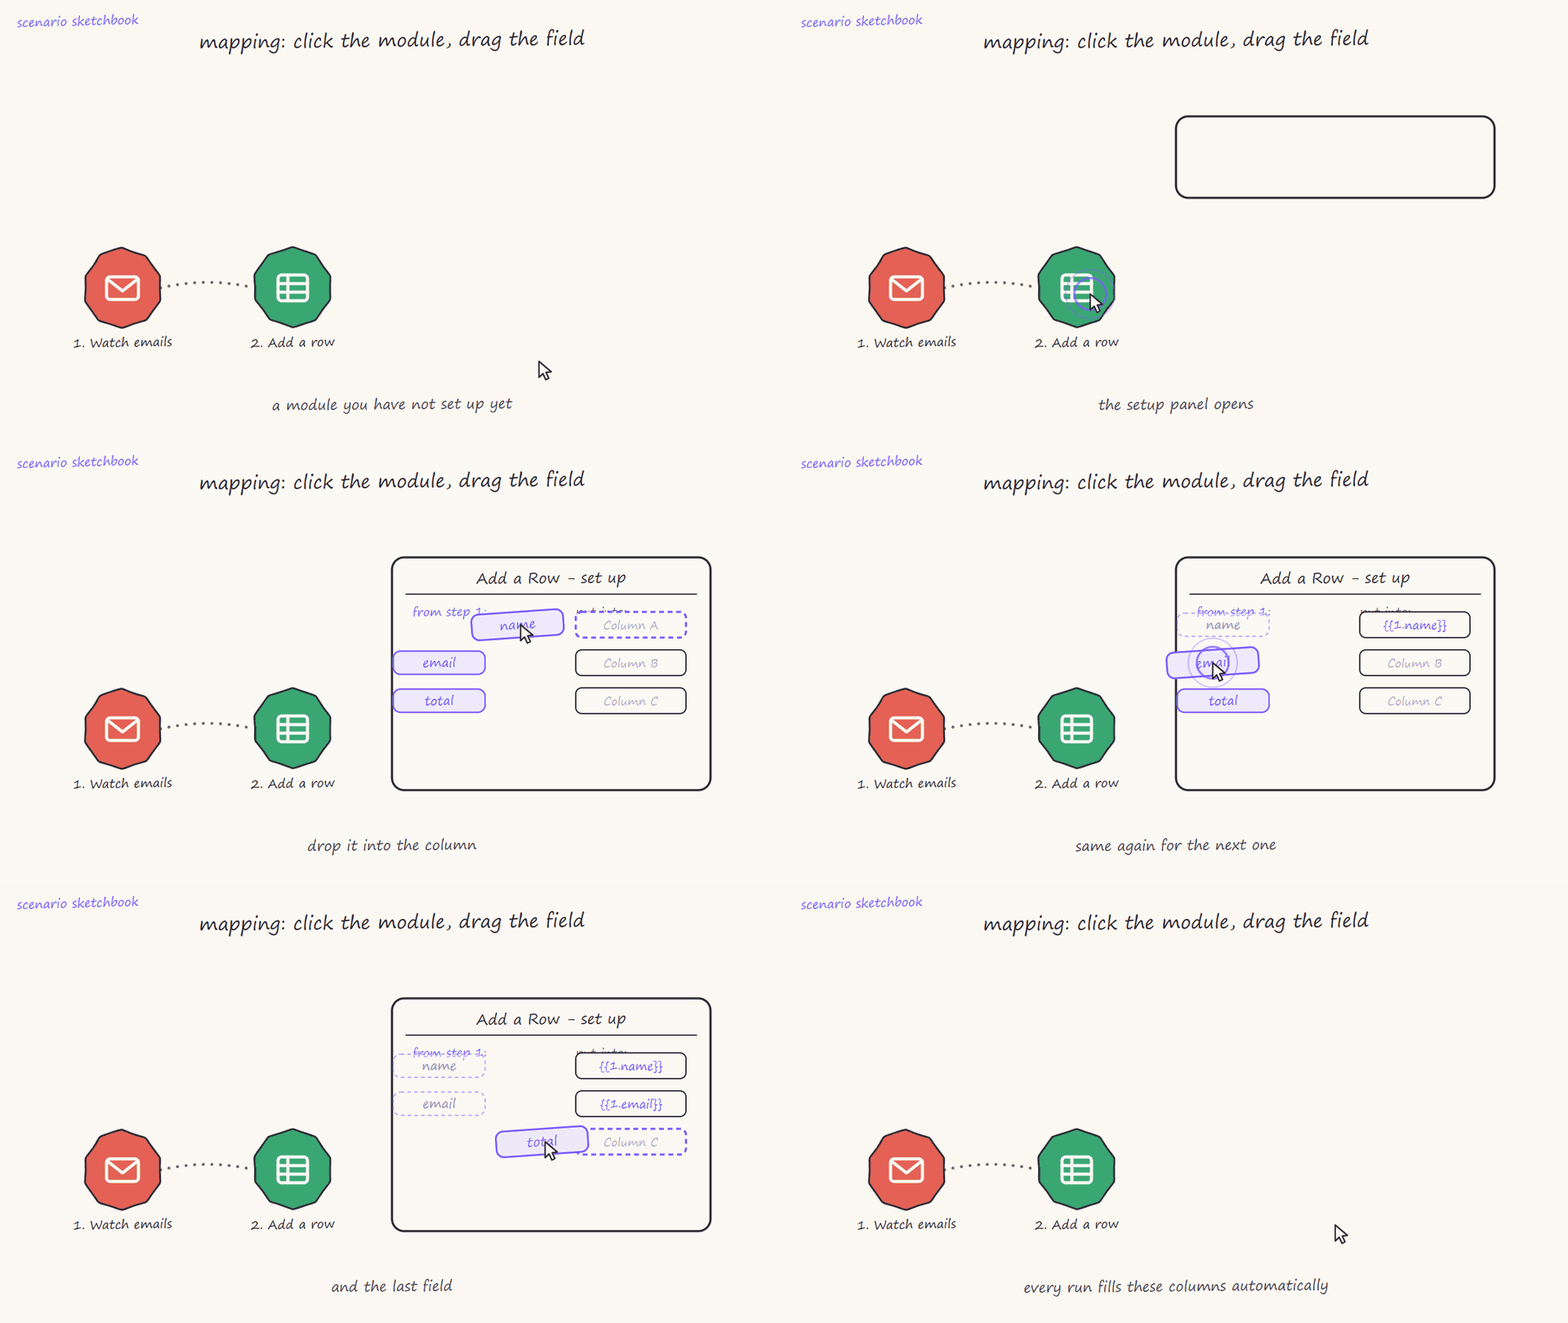
Here is the whole loop in motion: click the module you have not set up, the panel opens, and you drag each field from the previous step into the column where it belongs.
The mental shift that makes mapping click: you are never typing a value, you are pointing at a field. When you drag the name field from the trigger into a spreadsheet column, you are saying "whatever arrives in that slot, put it here." Type the value by hand and it will be right once and wrong forever after.
Three things worth learning properly in this phase, because every later problem traces back to them:
- Bundles vs items. One run of a module produces one or more bundles. A bundle is one complete set of data, like one order or one email. Most beginner confusion is really "how many bundles am I holding right now?"
- Data types. Text, number, date and collection are not interchangeable. A date that arrives as text will not sort, and a number stored as text will not add up. Make's functions (parseDate, formatDate, toNumber) exist for exactly this.
- The output panel is the truth. After every run, click the bubble above a module and read the real output. Do not guess what a module returned; look at it. This single habit shortens debugging more than anything else in this article.
Practice build: extend your phase 0 scenario so the Sheets row includes formatted date, cleaned-up text and a value pulled from deep inside the trigger payload.
You are done when you can open any module's output, find the field you need three levels deep and map it without guessing.
Phase 2: The data structures that stop most beginners (6 to 8 hours)
Goal: iterators and aggregators become obvious instead of mysterious.
This is where most self-taught learners quit, and it is the topic I have explained most often in live sessions.
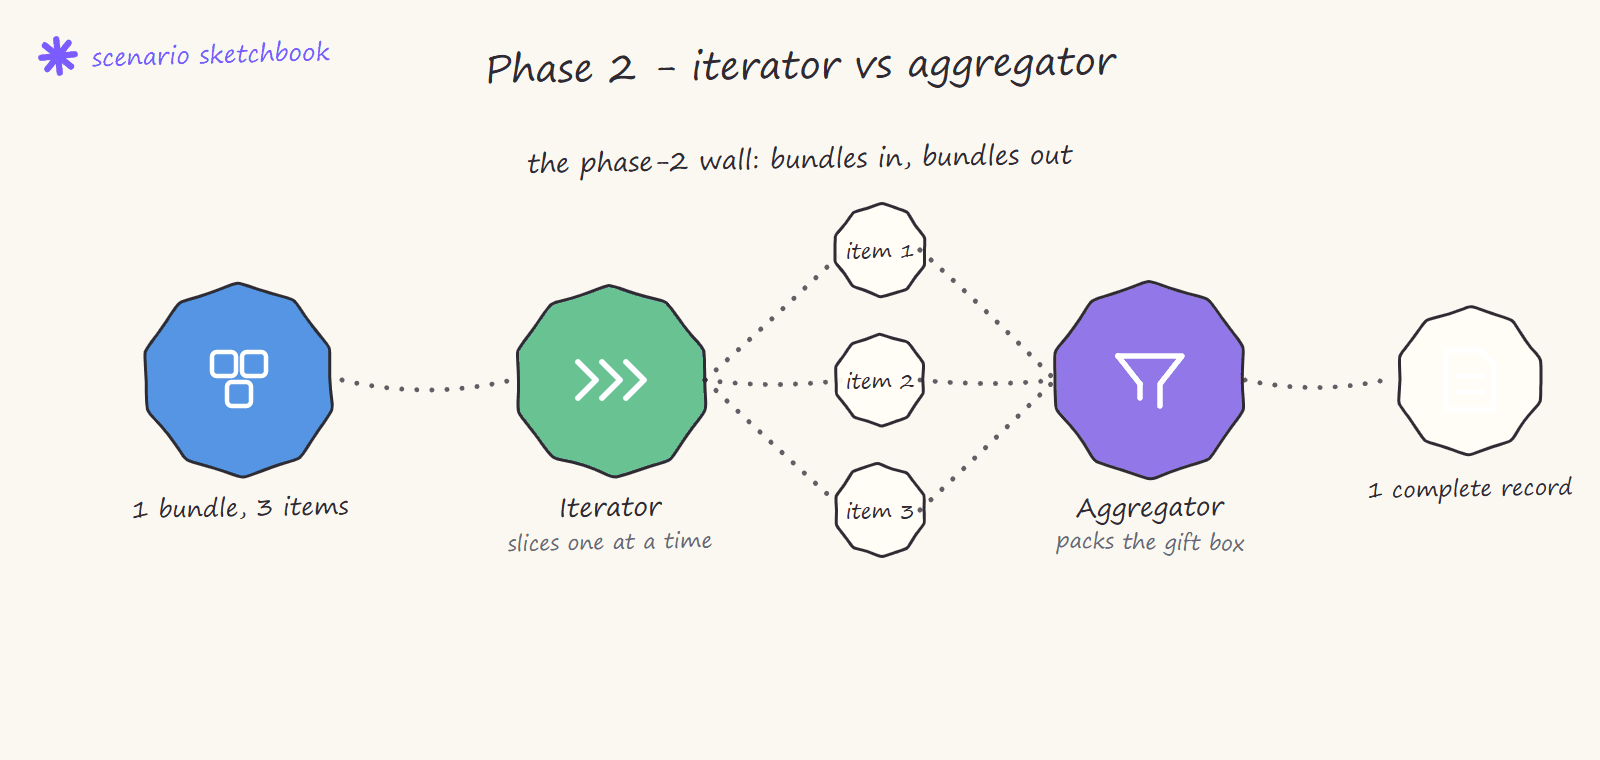
The analogies I teach with:
- An iterator is like slicing a loaf of bread. It takes one bundle containing many items and opens it up one item at a time.
- An aggregator is like packing Diwali gift boxes. You have wrappers in one container, sweets in another and notes in a third, and you combine one of each into a complete box per person. An aggregator collects items and produces one complete record.
- Functions instead of extra modules is making tea in one pot. Beginners add three modules to clean and combine text. The better habit is boiling it all in one pot with map, join and replace inside a single mapping field.
- The source module setting on an aggregator decides what one output bundle means. Merging three CSV files from Drive? Your source is the module that listed all three files, not the parser that handles one at a time. Choose the wrong source and your output is empty or scrambled.
Practice build: take a list (RSS feed, folder of files, multi-row sheet), iterate over it, filter it, then aggregate it back into one summary message.
You are done when you can predict how many bundles a module will output before you run it.
Phase 3: Logic and branching (4 to 6 hours)
Goal: one scenario that makes decisions.
Routers send data down different paths, filters decide what passes through. The analogy I use: it is weather-based dressing. Raining means raincoat and skip the rest, hot means light clothes, cold means jacket. A filter checks which condition is true and lets the bundle take that route only.
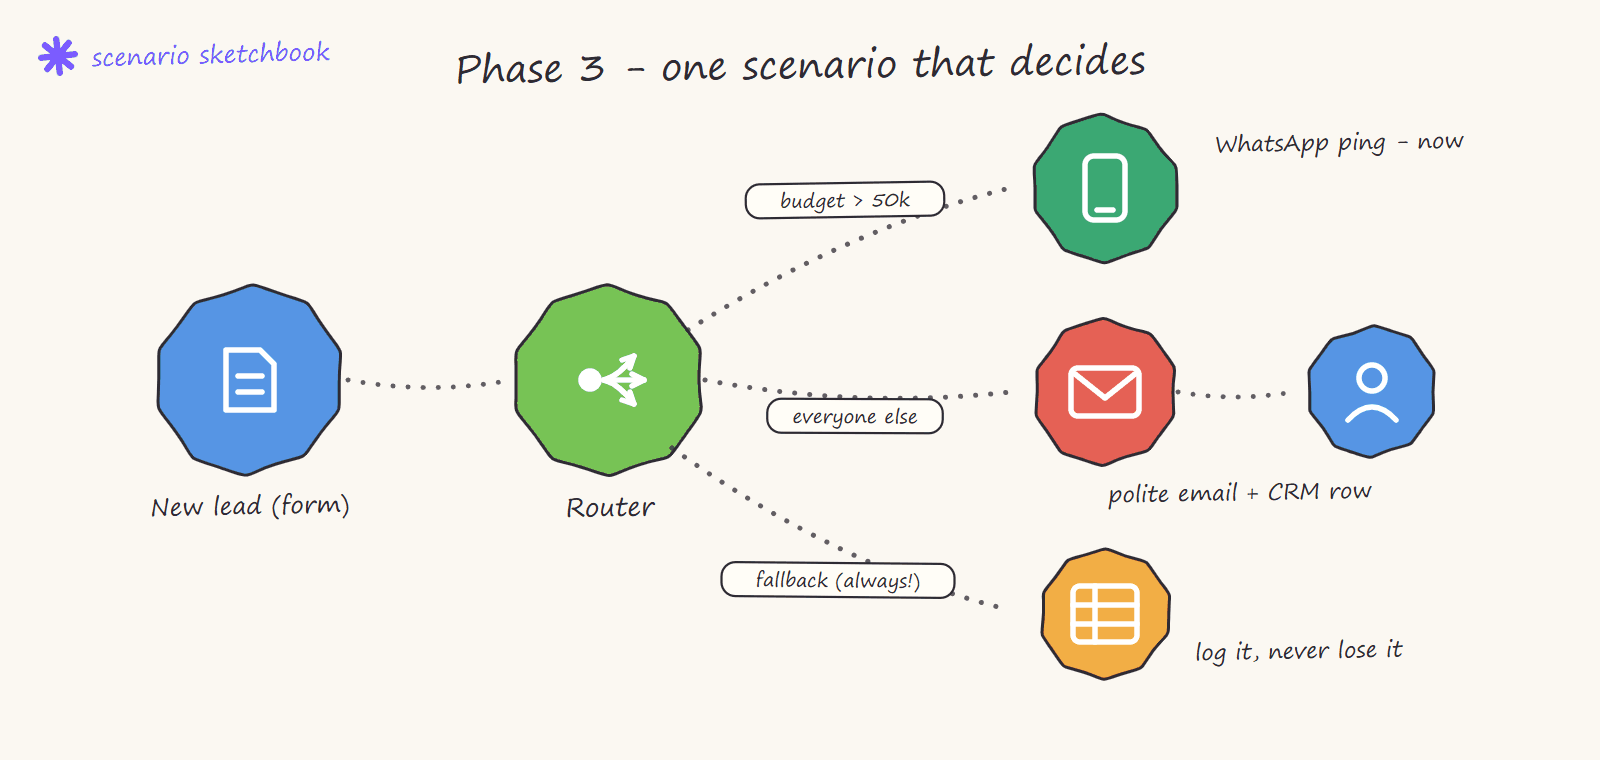
Two rules that save hours later. First, routes run in order, and by default every matching route runs, so a bundle can go down two paths at once unless you tick "stop processing after this route." Second, always build a fallback route with no filter, or the bundle that matches nothing simply vanishes with no error and no record. Most "my automation randomly skips things" reports are a missing fallback.
Add variables (Set Variable and Get Variable) here. Make does not merge data back across router paths, so variables are how a value set on one path gets used later.
Practice build: a lead-routing scenario. Form submission comes in, high-budget leads go to your phone instantly, everyone else gets a polite email and a CRM row.
You are done when you can build a three-path router with a fallback route and explain why the fallback exists.
Phase 4: Reliability, errors and cost (6 to 8 hours)
Goal: automations you can trust while you sleep. This phase is what separates hobby scenarios from production systems, and almost no tutorial teaches it.
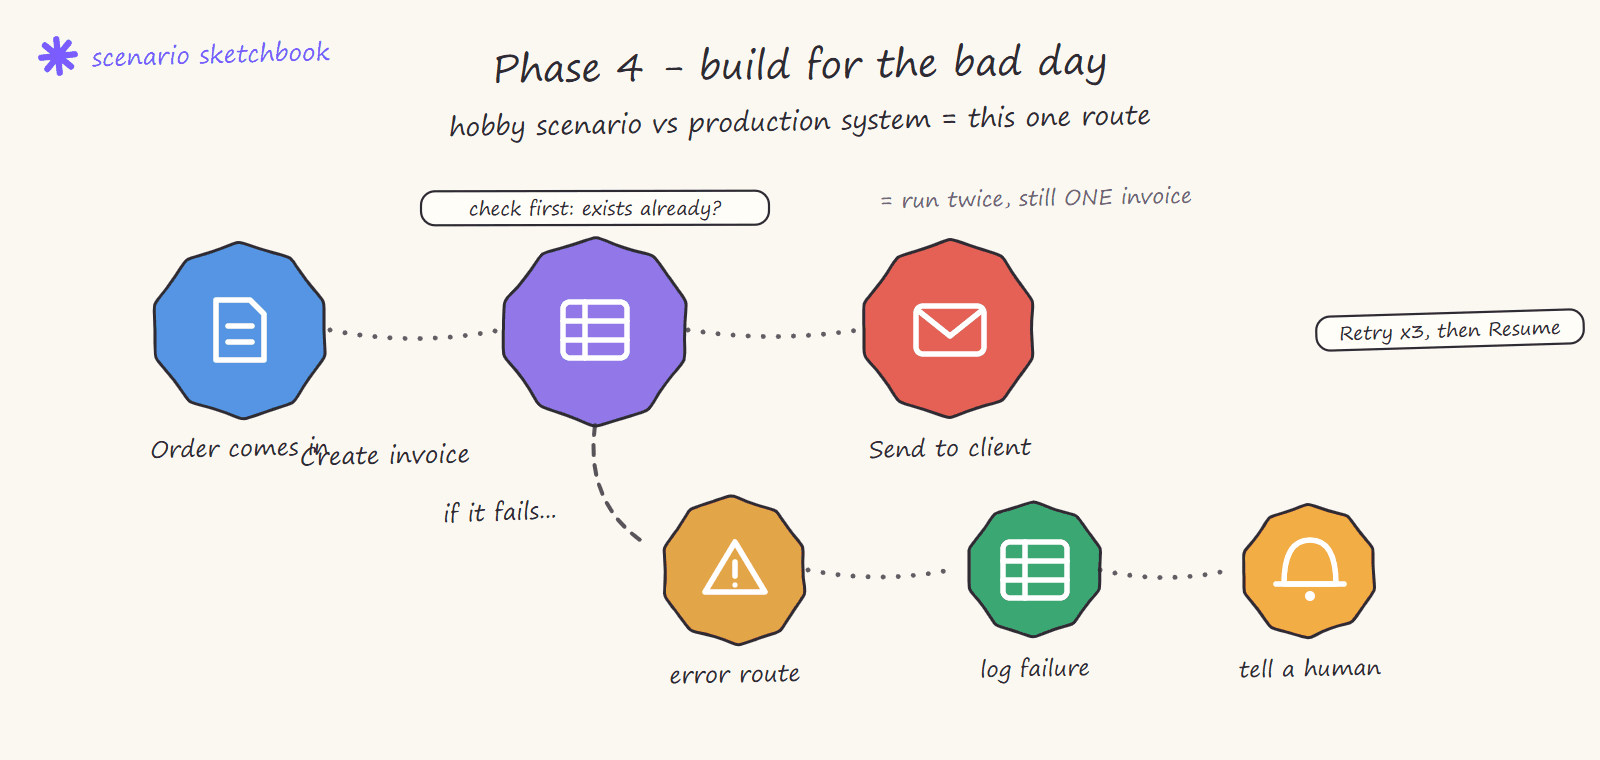
Learn: error handlers (Resume, Ignore, Break, Rollback), retries and why blind retrying duplicates records, idempotency (running the same input twice must not create two invoices), incomplete executions and the credit model (1 module action is 1 credit for standard modules, AI modules consume by token usage, and testing in development mode is free).
The four error handlers, in plain language. Right-click any module, add an error handler, and pick the behaviour that matches the real-world consequence:
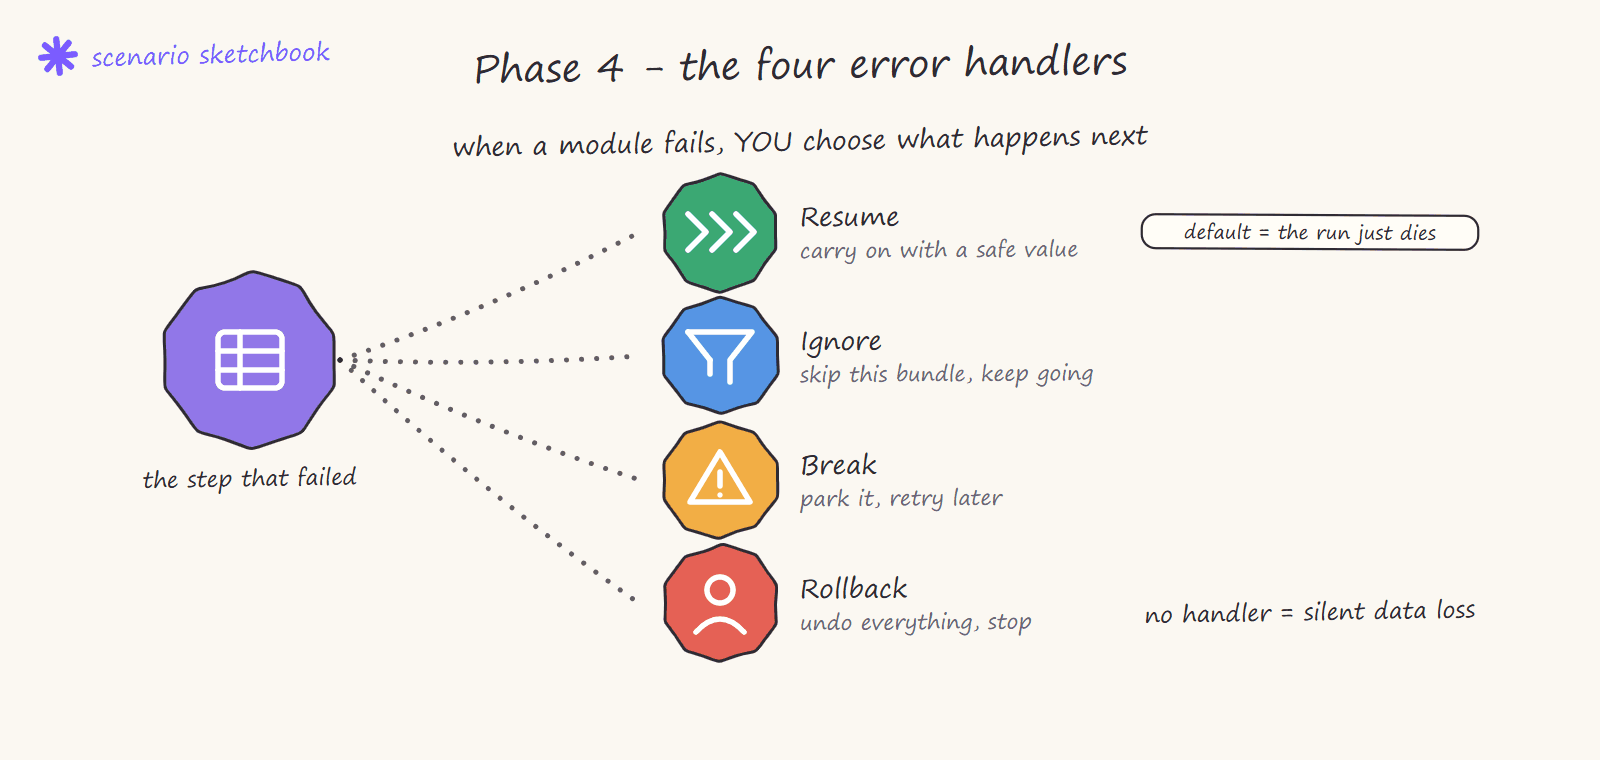
- Resume hands back a substitute value and carries on. Use when a missing optional field should not stop the run.
- Ignore drops this bundle and moves to the next. Use for batch jobs where one bad record must not block ninety-nine good ones.
- Break parks the failed bundle as an incomplete execution and retries it later, optionally automatically. Use for genuinely transient failures like a rate limit or a service being briefly down.
- Rollback undoes what the run did and stops. Use where a half-finished job is worse than no job, such as anything touching money or contracts.
With no handler at all, the run simply dies and the data with it. That is the actual difference between a scenario that "works" and one you can leave alone for a month.
Practice build: harden your phase 3 scenario. Add an error route that logs failures to a sheet and notifies you, and make the create-record step idempotent by checking before creating.
Real-world versions of this phase from my client work: automating invoices and contracts in Make and document and PDF workflows in Make.
You are done when a failed API call no longer means silent data loss, and you can estimate what a scenario costs per month before turning it on.
Phase 5: AI steps, then agents (6 to 10 hours)
Goal: you know when AI earns its place in a scenario, and you can build both kinds.
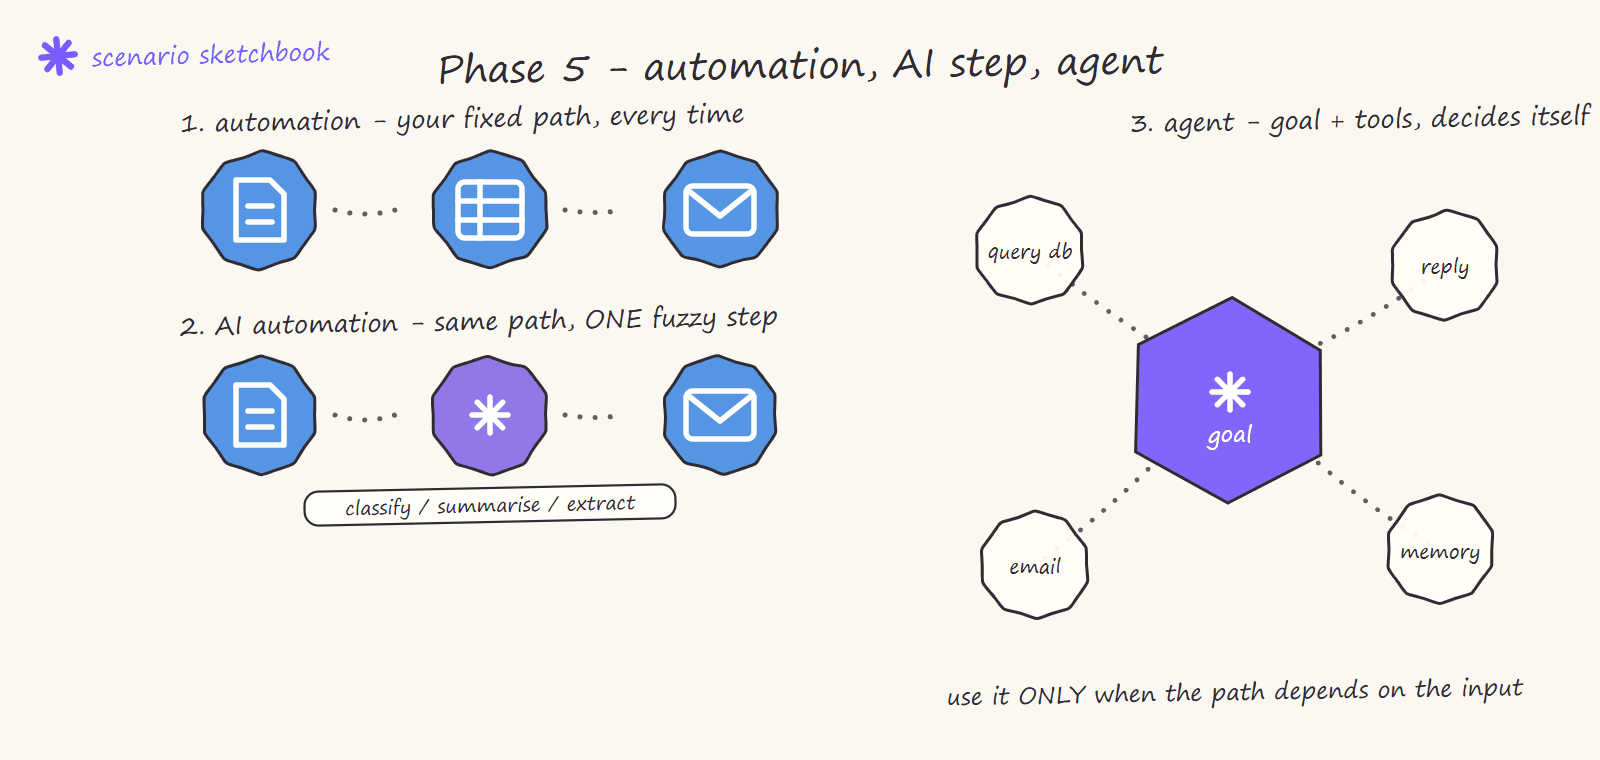
Learn the three-level distinction I teach in every session:
- Automation runs the steps you designed, in your order, every time.
- AI automation is that same fixed path with a model doing one fuzzy step (classify, summarise, extract).
- An agent gets a goal and tools and decides what to call and when. Reserve it for work where the path itself depends on the input.
Start with one AI step: add Gemini, Claude or OpenAI to classify incoming leads in your phase 3 build. Then learn extraction pipelines with AI PDF extraction using Make and Gemini. Then build your first true agent with my guide to Make.com AI Agents, and connect tools the modern way with the Make MCP server and Claude.
You are done when you can defend, for any task, whether it should be an automation, an AI step or an agent, and your first agent passes a test you wrote before you built it.
The path at a glance
| Phase | Hours | Outcome |
|---|---|---|
| 0. First contact | 1-2 | First scenario runs |
| 1. Mapping | 4-6 | You read data, not tutorials |
| 2. Iterators and aggregators | 6-8 | The hard part, conquered |
| 3. Logic and branching | 4-6 | Scenarios that decide |
| 4. Reliability and cost | 6-8 | Production-grade habits |
| 5. AI steps and agents | 6-10 | AI where it earns its place |
| Total | 25-40 | Production-ready |
Run it over four to six weeks part-time (one phase per week, with the practice build as the weekly deliverable) or as an intensive two-week sprint. Pair it with Make Academy's free courses for the certification track: Foundation and Basic early, Intermediate after phase 3, Advanced after phase 5.
Common mistakes to avoid
- Watching tutorials without a personal project. You learn Make by breaking your own scenario, not by watching mine run.
- Skipping phase 2 because it is hard. Iterators and aggregators are the actual skill. Everything after gets easier once bundles make sense.
- Building agents before automations. Agents are the dessert. Industry data is honest here: autonomous agents complete under 2.5% of real-world tasks end to end, so structured automation remains the backbone.
- Ignoring error handling until something breaks in production. Phase 4 costs six hours now or a very bad weekend later.
- Paying for courses that resell what the free sources teach. Between this path, Make Academy and the linked guides, the learning material is free. Pay only for live help, feedback and accountability.
FAQ
How long does it take to learn Make.com?
25 to 40 focused hours to production readiness. Your first working scenario takes under two hours, basic competence takes a weekend, and the reliability habits that make automations trustworthy take another two to three weeks of part-time practice.
Is Make.com hard to learn?
The first week is easy, then iterators, aggregators and mapping create a wall around hour ten. With the right analogies and one practice project the wall takes a single focused weekend to cross. The curve is front-loaded: after phase 2, everything accelerates.
Can I learn Make.com for free?
Yes. Make's free plan is genuinely usable for learning, Make Academy courses are free, and the guides linked in this path are free. The two free options are compared in full in is Make.com free?. The one-month Pro trial (make.com/en/register?pc=prime) adds 10,000 credits and the AI tools while you learn.
Do I need to know how to code?
No. Make is visual end to end. Phase 2 asks you to think in data structures, which feels technical but requires zero code. Functions like map and join are formulas, closer to spreadsheets than programming.
What should I build first?
Something from your own week: a report you assemble by hand, form entries you re-type, a reminder you always forget. Personal pain is the best curriculum. Then rebuild that same project at every phase of this path.
Learn it with me
I teach this exact path live: hands-on sessions in English and Hinglish, built around real business scenarios rather than toy examples, as the official Make Silver Solution Partner in India.
Start free (no card required): make.com
Start with 1 month free on Pro (10,000 credits + all AI tools): make.com/en/register?pc=prime
Learn live or get it built: live sessions are on Topmate; builds start with a free consult